|
Computes coordinates for the highlighted point using any existing survey points. Coordinates are computed by going the New Bearing and New Distance from the From point.
The selected point from the Traverse View becomes the Computed Point in the Compute Coordinates dialog box. You can re-compute its coordinates based on any other points in the survey, then save those coordinates in the Traverse View.
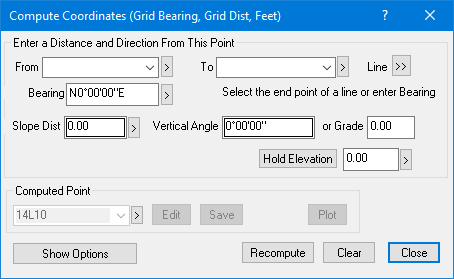
Enter a Distance and Direction From This Point
Enter the data used to compute the point.
From, To, Line
The new coordinates are computed from this known point. Use the [>] pick button to select the point from the current drawing.
You can also select both a From and To point to establish the starting point and bearing of the computation. Use the [>>] pick button to select a line from the current drawing.
Bearing/Azimuth
Specify the direction to go from the known point. Use the [>] pick button to select the bearing from the current drawing.
Slope Distance, Vertical Angle, Grade
The Slope Distance, along with the Vertical Angle or Grade, is used to compute the Computed Point.
You can specify the vertical component of the distance by entering either a Vertical Angle or a Grade. If you enter either one, the corresponding value for the other is computed automatically and displayed in the dialog (assuming you have entered a Slope Distance).
To enter a horizontal distance, set Vertical Angle and Grade to zero.
You can use equations for distance and direction (i.e. to go half the distance from point 7 to point 14, enter 7..14/2.
Hold Elevation
If you enter an elevation to hold for the computed point. TPC first computes the elevation based on the Slope Distance and Vertical Angle or Grade, then applies the Hold Elevation. Hold Elevation will always be in survey units.
If you enter a hold elevation, TPC does not compute the equivalent Vertical Angle or Grade for the Hold Elevation. It leaves whatever you entered and simply updates the elevation of the computed point.
Once TPC holds an elevation, it redraws the Hold Elevation in another color, usually a blue. To remove the Hold Elevation, left click the button.
Computed Point
Enter a point label for the point you want to create, or enter an existing point label to update it's position.
Edit
Choose Edit to enter a description and point symbol for the computed point.
Save
Choose this button to save the new point you've created or update the existing point you recalled.
Undo
If you have created a new point or updated an existing point, TPC will display the Undo button. Select this button to undo the most recent save.
Plot
Adds the point to the ‘Point Plot’ traverse and the current drawing.
Summary
Add this computation to the current Report.
Recompute
As you enter data into the dialog, TPC computes the position of the Computed Point, even though you still have to Save it. Pressing this button just repeats that last automatic computation. It's a way to make sure TPC has tracked with all your changes.
Clear
Clears all fields in the computes coordinates dialog.
Close
Closes the dialog with whatever changes you made to the new or existing computed point.
Show Options
Initially, the types are preset to the survey or the generating traverse. You can select different Distance and Direction types for this dialog to use by clicking Show Options and selecting the types you want.
Geodetic vs Non-Geodetic
TPC requires the distance and direction types to match for this dialog. This is because the computed coordinate must be a valid geodetic or non-geodetic foresight computation.
Related Topics
Computing New Coordinates for a Point
Entering Equations
Setting the Default Direction
|

